 en
en Italian
 German
 French
 Spanish
 Russian
There are several ways to fix incorrect or missing tags with mp3Tag Pro:
- Download tags from MusicBrainz, Amazon, FreeDB, Discogs.
- Extract tags from filenames and folder names.
- Edit tags for any number of selected songs manually.
- Import tags from a structured text file.
These methods work for all supported formats, including MP3, WMA, M4A, AAC, MP4, OGG, FLAC, APE, and others. Here we will discuss the latter method. It can be very useful both for home users and for professionals.
Select Audio Files
In the “Folders” area of mp3Tag Pro, select a folder containing songs that need to be tagged (1).

To highlight all songs in the selected folder, click the green checkmark button in the upper right corner (2) or press Ctrl + A. Alternatively, you can select groups of songs using the Ctrl + click and Shift + click combinations.
Finally, click the “Generate tags” button below the list of songs (3).
Select a CSV File
This opens the “Rename / Generate” window of the program. Available tools are represented by tabs in the upper right area of the window:

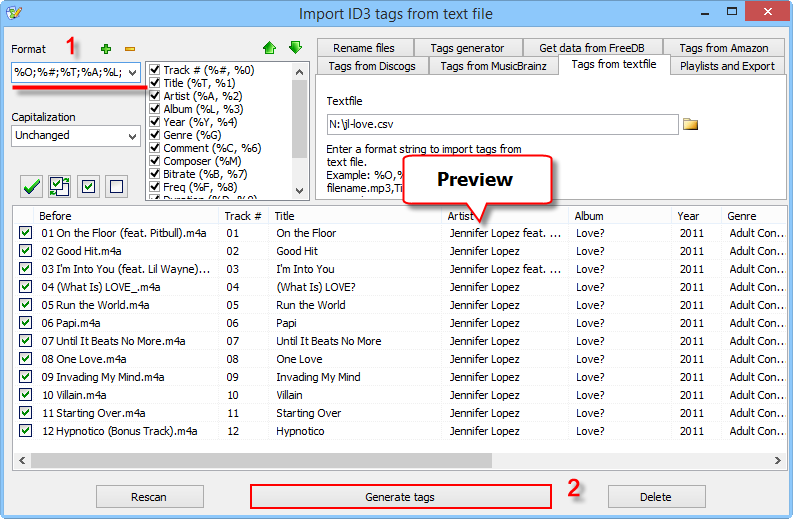
Click the “Tags from textfile” tab name to open this tab (1).
There is a “Textfile” field on this tab. You can enter the path to your CSV file into this field. Alternatively, click the folder icon (2), to open your CSV using the “Open file” dialog of Windows:

Import Tags
The “Textfile” field now contains the path to your CSV file with tags, but otherwise nothing changes. There are no tags in the preview area.
If you have already worked with mp3Tag Pro or read articles about other features, you know that this is about the “Format” field in the left upper corner of the window (1).
We need to enter the correct format into this field.
If you exported tags with mp3Tag Pro using the default order of fields, you will be able to import the tags with this format:
%O;%#;%T;%A;%L;%Y;%G;
To check its meaning, we can simply take a line from our CSV:
06 Papi.m4a;06;Papi;Jennifer Lopez;Love?;2011;Adult Contemporary;
;;263;44100;00:03:43;8 Mb;
06 Papi.m4a is a filename, as there is the .m4a extension. We have a file with this filename, and we want to import tags into it. This is important: your CSV file must always contain correct filenames. mp3Tag Pro matches your real filenames with filenames from your CSV file, and so it knows which files should receive this or that set of tags.
Hint: If you have a CSV file with tags in the correct order, but there are no filenames, or filenames in the CSV are not the same as your real filenames, you can use the export feature. Just export your real filenames and insert them into your CSV using a spreadsheet program.
Further we see: track number, title, artist, album, year, genre, some empty fields, and some technical parameters. Let’s replace real values with generalized ones:
Filename;Track number;Title;Artist;Album;Year;Genre;unimportant
Now we can look up variables in the list next to the “Format” field and replace the generalized values:
%O;%#;%T;%A;%L;%Y;%G;
We entered nothing for “unimportant”, but note that our format ends with a semicolon. This cuts off the rest of the values.
Check if the preview for your future tags is correct and click the “Generate tags” button (2).

Now our files are tagged, and their tags can be used to rename and sort them.
If tags in your CSV file follow a different pattern, you may need to adjust the format. Just use the same method as above:
- Take a real line from your CSV file.
- Generalize. Do not change anything else. If values in your CSV are separated by semicolon, the generalized values must also be separated by semicolon. Some files use commas or tabs as separators.
- Replace generalized values with variables from the list next to the “Format” field. Remember that %O (the letter, not zero) stands for filename.
You can use the export and import features of mp3Tag Pro to back up and restore your tags, to process tags in a spreadsheet program, to import tags from a database, and so on.


