 en
en Italian
 German
 French
 Spanish
 Russian
mp3Tag Pro is a powerful MP3 tag editor. It can easily generate tags from parts of filenames for thousands of files. If you have a database of tags, the program will import tags to corresponding MP3, WMA, OGG, FLAC etc. files. If there is an album with no tags and cryptic filenames (like track01.mp3), the program can download tags from FreeDB. To organize your music collection, use the renaming capabilities of the program.
In addition to getting tags from FreeDB, mp3Tag Pro can also download tags from Discogs, MusicBrainz, Amazon. However, unlike with FreeDB, here you need to have some information – either artist, or album (both of them would be just perfect).
Select all files that belong to one album. On the toolbar of the “ID3 tags” area, click “Generate tags”:

A new window will appear. We need the “Tags from Amazon” tab.
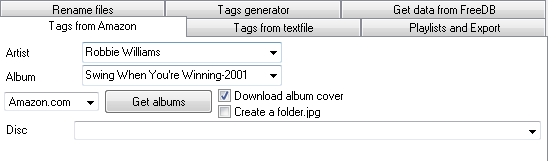
Take a look at “Artist” and “Album” fields. The program automatically takes corresponding values from tags of the selected files. However, if tags are empty, you will have to fill out the fields manually.
Note that if the name of the album is too long, mistyped, or contains some additional information (on the screenshot above we can see ‘-2001’, which doesn’t belong to the album’s name), it will be difficult for Amazon to find the album. You can easily cure this. Simply remove unnecessary information or shorten the name. In the example shown on the screenshot, it is sufficient to remove everything but “Swing” in the album field. With “Robbie Williams” as artist, it provides a unique combination.
Near the “Get albums” button, you can select a localized Amazon service, like amazon.de, amazon.fr etc.
Click “Get albums” to send an inquiry. A couple of seconds later some information will appear in the “Disc” list and in the preview area. The “Disc” field shows different versions of the album (if applicable), you can select them from the list. See in the preview area how the versions are different from each other.
After choosing the proper version you can save tags (click “Save tracks info”). But first, check the preview area to make sure that information will be written to the right files.
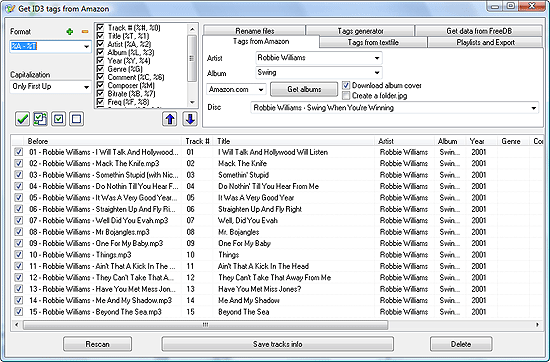
Consider the following situation. A group of songs have information from the title field as filenames. The system sorts them alphabetically. This is not how they were sorted originally. However, data obtained from Amazon shows the original order, and so titles are assigned to wrong files:
We need to restore the original order. Compare filenames and titles received from Amazon. Filenames are shown in the leftmost column (“Before”), the rest of columns show downloaded information. You can easily notice that, in the original order, “Mack the Knife” has the second place.
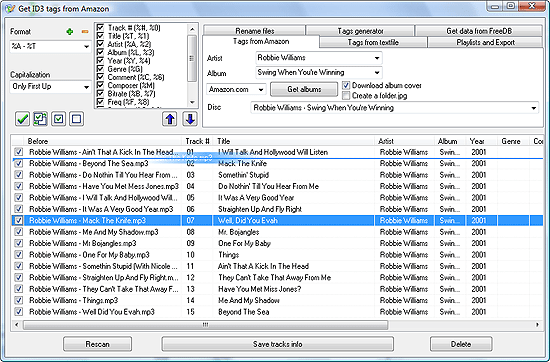
So, let’s select the track and drag it to its place. Click the file, drag it a bit to the right, then up or down. A line should appear. The line determines where the file will be inserted. We need it as number two, so let’s insert it there.
Re-select the downloaded album in the “Disc” list. This will re-assign titles, and now “Mack the Knife” will get the correct title.


